

Manage Subgroups
Manage Subgroups
About Subgroups
Important: Only class group Owners and Co-teachers are able to create Subgroups.
-
Subgroups can be created within any class group.
-
The purpose of a Subgroup is to organise your students into smaller groups. By organising your students this way, you are able to achieve the following:
-
assign modules to specific Subgroups
-
grant access to sections/activities for specific Subgroups
-
assign Team Activities and gamified modules to specific Subgroups
-
Create Subgroups
-
From the Class Group page, select a Class Group.
-
Under the Admin tab, click New Subgroup.
-
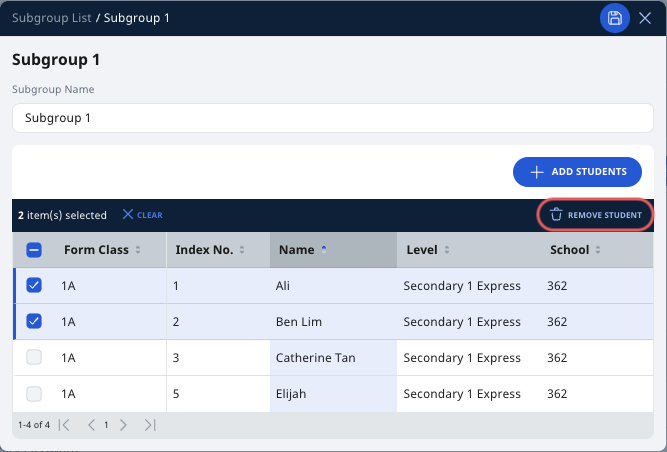
Enter the Subgroup Name.
-
Click Add Students.
-
You can add students to the subgroup by searching for their names.
-
You can also filter and sort students based on the following fields:
-
Form Class
-
Index No.
-
Name
-
Level
-
School (useful for class groups that contain students from more than one school)
-
-
You can hide students from all subgroups by clicking the Settings icon

and selecting the checkbox beside Hide students from all subgroups.
-
Check the students to be added to the class group and click Add.
-
Complete the subgroup creation by clicking Save, followed by X. The newly-created subgroup will appear in the form of a card under the Subgroup List.
Note:
-
Subgroups without students can be created.
-
Subgroups with the same name as other subgroups can be created.
-
Subgroup cards are arranged by alphabetical order; you are advised to name subgroups with suitable prefixes to better organise them.
-
Each student can be added to more than one subgroup.
View Subgroups
-
From the Class Group page, select a Class Group, followed by the Admin Tab.
-
Under the Subgroup List, you can view the list of subgroups that have been created.

-
Click the individual Subgroup card to view the details of each subgroup.
Edit a Subgroup
-
From the Class Group page, select a Class Group, followed by the Admin Tab.
-
Under the Subgroup List, you can view the list of subgroups that have been created.
-
Click on the Subgroup card that you wish to edit.
-
You may edit the following:
-
the Subgroup Name
-
add or remove students
-
-
Click Save to confirm your changes, followed by X.
Delete a Subgroup
-
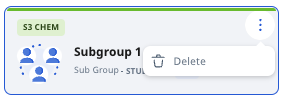
To delete a Subgroup, click the Overflow (3-dot icon).
-
Click Delete.
-
A confirmation prompt will appear to confirm your action.
Note: Action cannot be undone.
-
Click OK to confirm.